Tuesday, December 29, 2015

Tatted Denim Shirt Embellishments

DnmShrt2DnmShrt8
DnmShrt6
This pattern was published in The Tatter’s Treasure Chest, edited by Mary Carolyn Waldrep, Dover Publications, NY, 1990. This was an out-of-copyright pattern republished by Dover Publications from a J. & P. Coats Tatting publication. The pattern can be found on page 78-79 of The Tatter’s Treasure Chest.


While updating/cleaning up my website recently, I realized that I had only posted two of the variations of patterns that I had done for my ‘Tatting Embellished Denim Shirt’. So, in several postings, I will continue to share my variations of a classic pattern (seen in the bottom photo) that I used to embellish a denim shirt.

Not counting the original pattern (used along the button placket--bottom picture) I created 5 different variations. Look for them in upcoming blog posts!

Monday, December 7, 2015

Glass/Enamel Tatting Shuttles–Very Unique!


194a
The ShuttleSmith Glass/Enamel Copper Tatting Shuttle #194

I knew my The ShuttleSmith Glass/Enamel Copper Tatting Shuttles were unique….I just didn’t realize HOW unique until I just recently did a Google search for ‘enamel tatting shuttles’ and ‘glass tatting shuttles’. I was surprised by what I found (or should I say what I did NOT find!).

In my Google search, it was no surprise to me that Heidi Nakayama’s name, photos, and website came up….she is the ‘Queen of Tatting Shuttles’. Heidi wrote the book on tatting shuttles, literally and physically: Tatting Shuttles of American Collectors is a must-have book any tatter interested in the beautiful tools that have been a part of tatting’s history. Check out her website at: Tatting Shuttles of American Collectors Website . It is full of eye-candy and great articles on contemporary tatters and shuttle collectors. Heidi has Dora Young’s shuttle & tatting collection as well as rights to Dora’s very unique book, which she is planning to republish.

A chapter about my The ShuttleSmith Sterling Silver Tatting Shuttles (I used to make) is included in Heidi’s book. I had the good fortune to meet Heidi at the 1998 IOLI Convention in San Diego, California. It was at this time she was still actively researching and writing her book and had taken photos of my handmade sterling silver shuttles. It was there that Heidi asked me if I had ever considered enameling my silver shuttles. At that point in time, the answer was ‘No’–I had a full-time job, two small children, an active family lifestyle, and active ‘in my spare time’ teaching needlework and lacemaking techniques, teaching weekend motorcycle safety classes and creating silver tatting shuttles….there simply was no time for another hobby!

Now flash-forward to a year or so ago—I stumbled into a class on enameling and was hooked! Of course, my first thought was applying the artform to tatting shuttles (everything is TATTING related!). I don’t want to know how much money I dumped into this new artform….but I have had alot of fun in the process. And just now after doing a search on enamel/glass tatting shuttles I have realized how very unique my shuttles are.

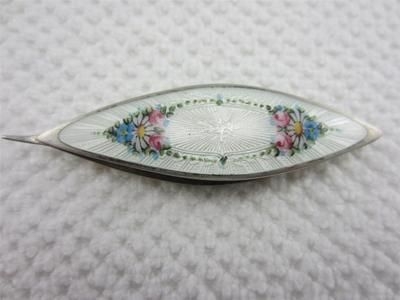
What I did find on the internet was a couple of photos of old/historical enameled shuttles. Most have a thin layer of glass/enamel over silver. Many times, the underlying silver is patterned. This is an enameling technique/style called ‘quilloche’ or ‘basse taille’. I have seen a few enameled shuttles in other peoples collections but have never found one myself in antique stores. I believe old enameled shuttles to be fairly rare. Now that I am an ‘enamelist’ I know that enameling does not work well with ‘sterling silver’. The base needs to be ‘fine/pure silver’. The impurities (the 7.5% of non-silver metal) in ‘sterling silver’ will not allow the glass particles of enameling to fuse to the metal base.

Webster
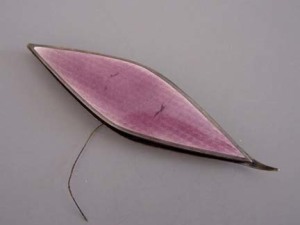
Webster shuttle with a thin layer of transparent purple enamel over a patterned silver base
 
antiqueenamelshuttle
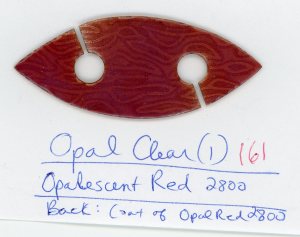
Old enamel shuttle with a thin layer of tranparent white enamel over a patterned silver base with flower decal decorations.

Beyond the historical enamel shuttles, probably from the early part of the 20th century, I could not find any reference to 
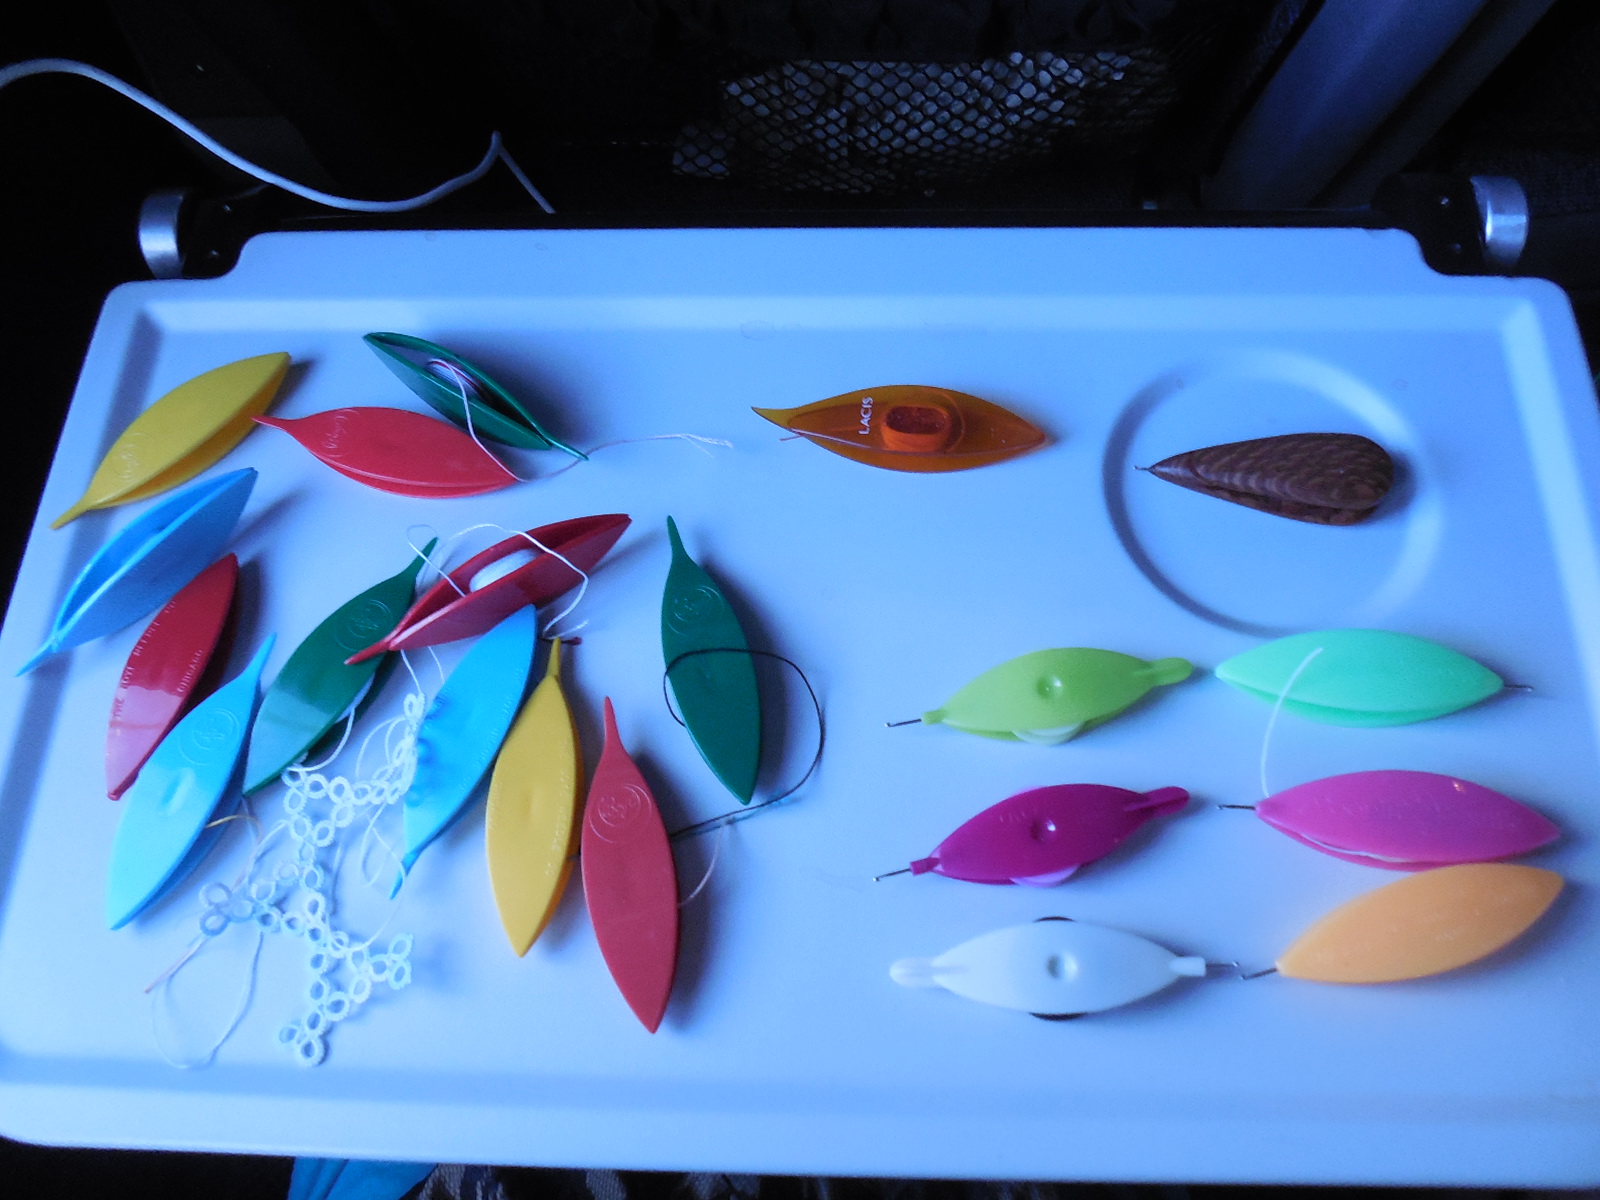
Enamel Tatting Shuttles until I created mine. Now if you Google search ‘Enamel Tatting Shuttle’, my The ShuttleSmith Glass/Enamel Copper Tatting Shuttles come up in big numbers. I use copper as the base metal for my tatting shuttles–A. it’s alot cheaper to buy, B. it’s easier to use, & C. why use a precious/expensive metal when you are going to cover it up with something like glass?

161
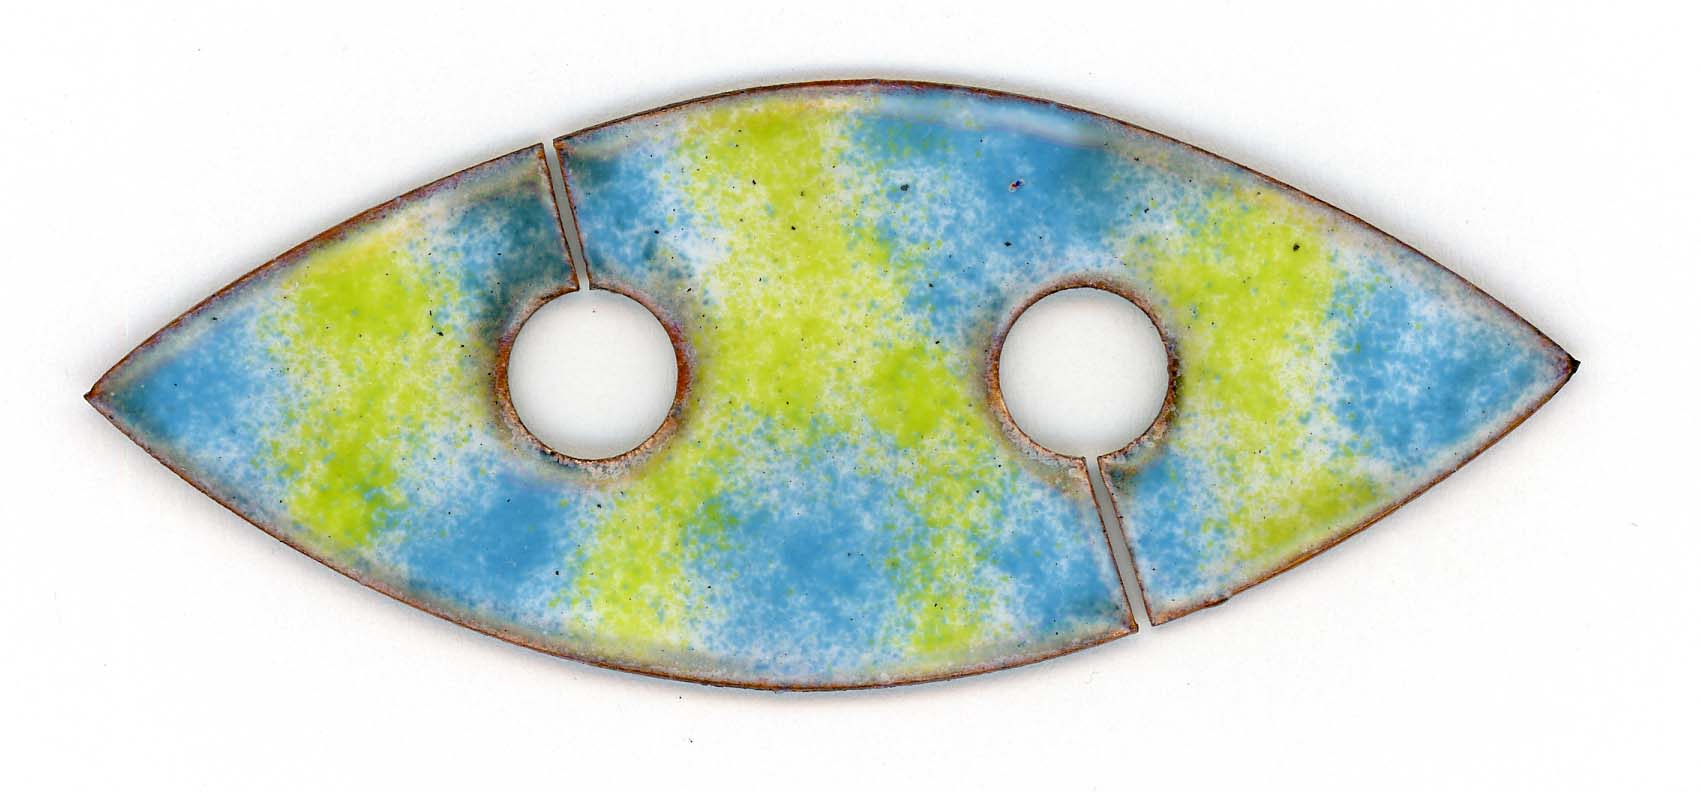
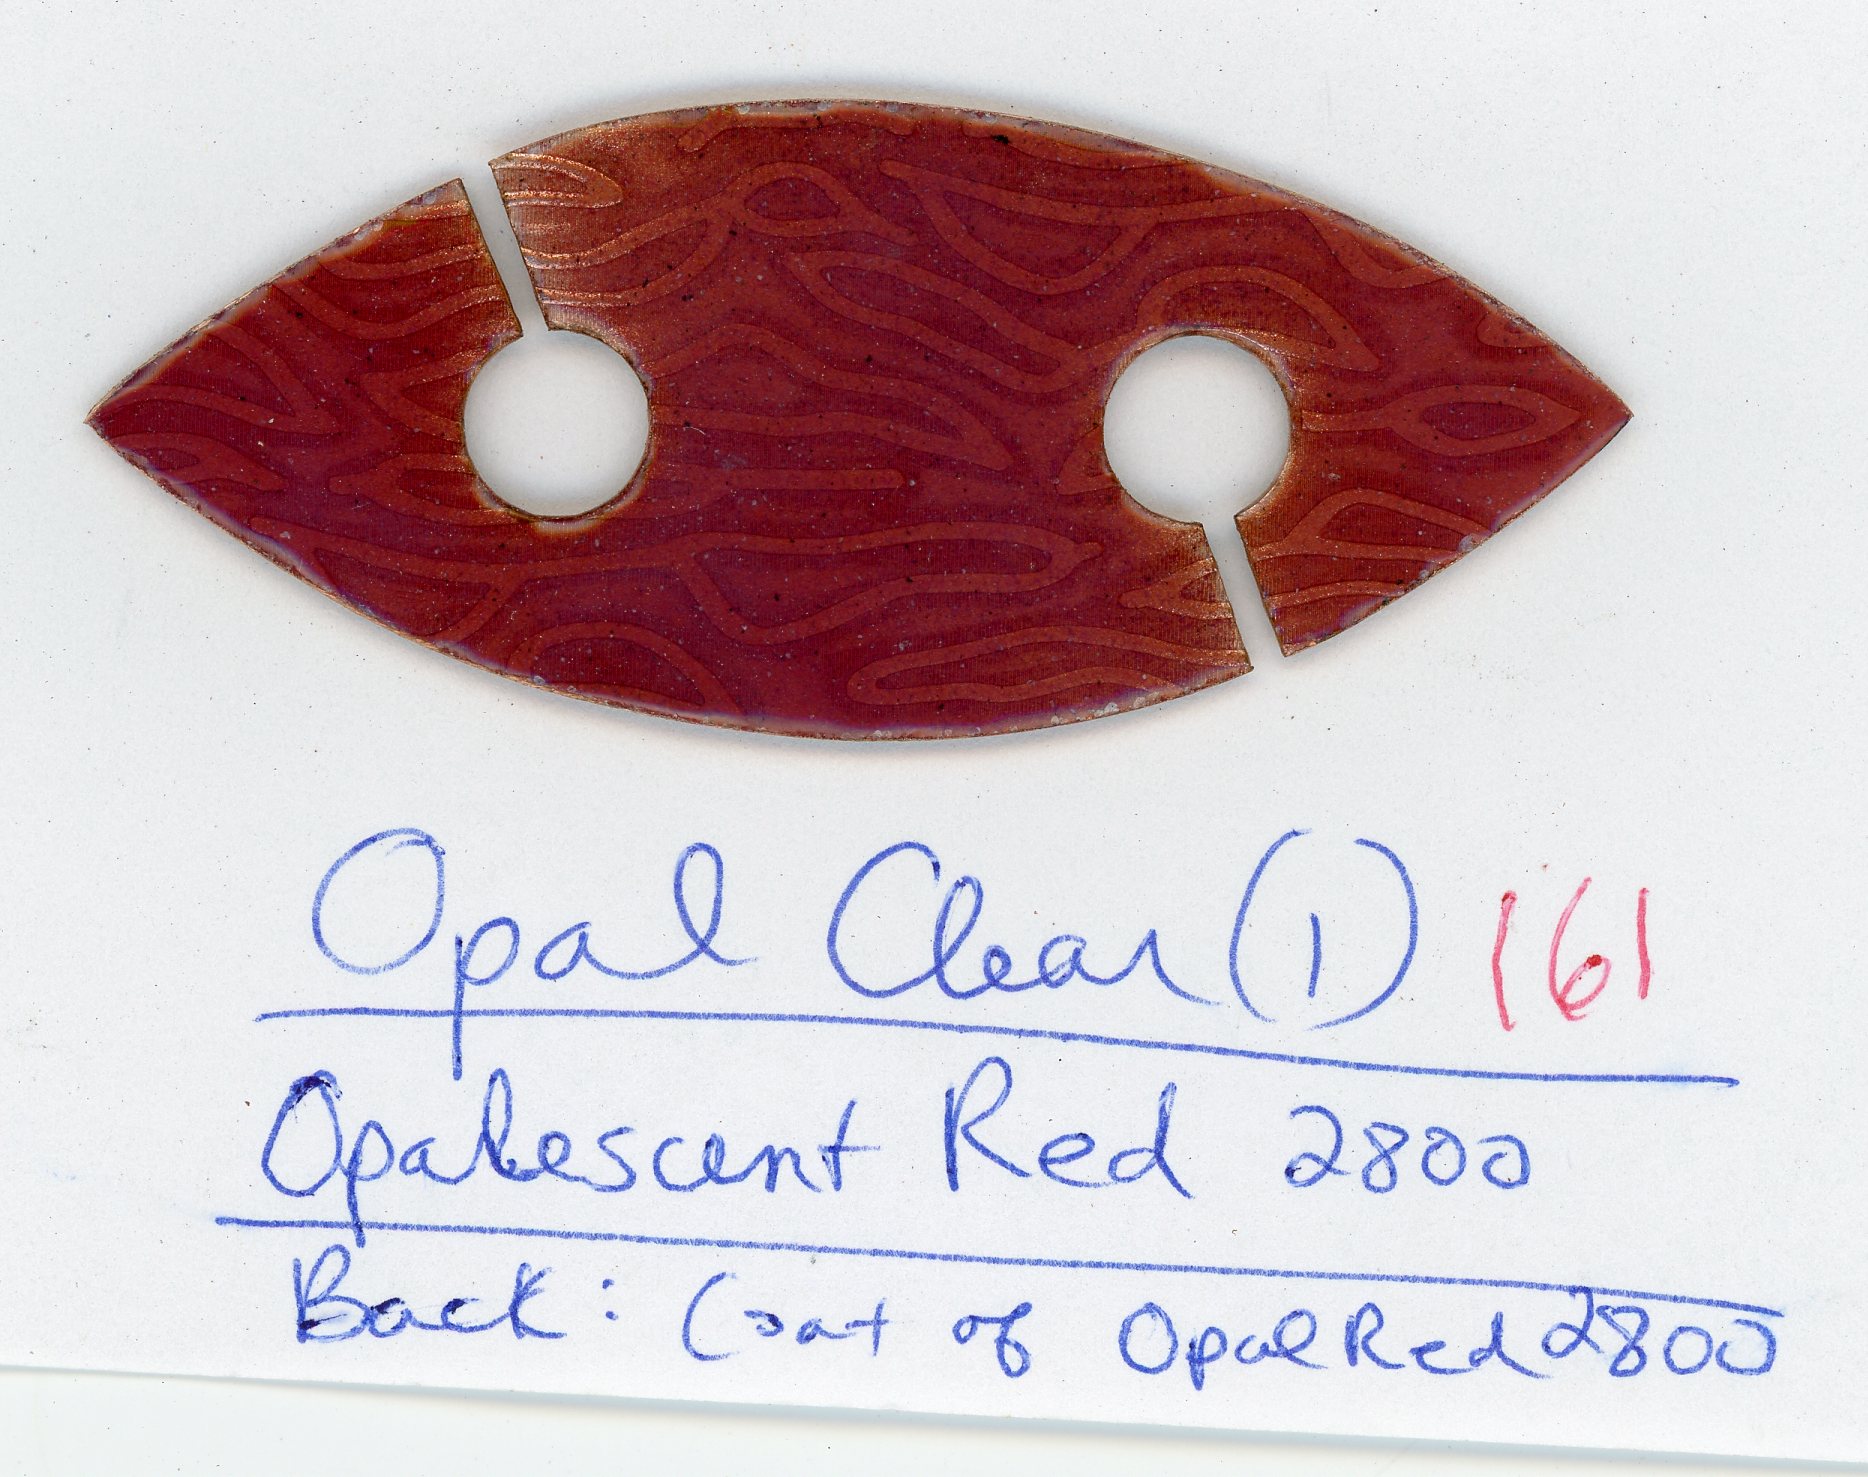
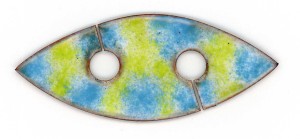
The ShuttleSmith attempt at creating a Basse Taille type Glass/Enameled Tatting Shuttle

ShuttleSmith Glass/Enamel Copper Tatting Shuttles are a layer of copper metal upon which glass particles are fused/melted to the base metal using high heat (ca 1300C) from a hand-held torch. Both sides are coated in glass, though the backside is quite plain due to enameling process limitations. The result is a flat, hoare-style tatting shuttle that IS glass. It ‘tinks’/sounds like glass. And it can/will break like anything glass if it is dropped (usually from a distance to a hard surface such as concrete).

Check out ShuttleSmith Glass/Enamel Copper Tatting Shuttles for sale on Etsy: The ShuttleSmith Etsy Store

Tuesday, December 1, 2015

Highlighting (Part 2) & Cleaning up my Website

This a photo from an Old Blog Postings (Tatting Embellished Denim Shirt--Patterns Included)


I do know that my website is ‘messy’. The theme that I chose to start creating my website probably wasn’t the best choice. But all this web/computer stuff is not my thing! I’m a tatter-first, a designer & shuttle maker-second, then the computer/web stuff comes after that so that I can communicate with other tatters.

So in an attempt to clean-up my website, I spent a few tense moments with my husband trying to figure out something and I have persevered!!!! I actually want to sing the song “I have survived…” here now. Anyway, I worked on the OLD BLOG POSTINGS pages and instead of having a drop-down submenu item, I only have one page in which I have all the pages listed and linked to open in a new tab/window. I’m not sure if opening the page in a new window is the right thing to do or not, but that would involve another (probably tense) conversation with my husband to figure out. I choose my battles –I mean conversations–regarding technology very carefully. The problem with him is that he doesn’t realize everyone is as technically savvy or as smart as he is. (Do keep in mind that he is a Vice President for an IT section at a Fortune 500 company.)  So I do acknowledge that talking ‘technical talk’ to this me can be very painful to him too.

So take a look at my OLD BLOG POSTINGS section. It is here you will find information that I had posted in the past to another blog site in the past. In an attempt to keep what may be the good stuff (not just ramblings/dribble) I decided to move certain things to this website and this menu.

I’d be interested in hearing what you think of this format. Email me direct at: k.bovard@yahoo.com or leave a comment on the page.    BTW, does the ‘Comment’ section work????? Again, my lack of web knowledge is showing.

Monday, November 30, 2015

Highlighting Info on TheShuttleSmith’s Website–Part 1


Cycle B

I’m not sure if it is vanity or not that I want people to come to my website, find information they can use, and possibly give me feedback on what they may or may not have found to be interesting/informative/worthwhile. I guess the bottom line is that I am a slight bit of an extrovert and because of this, I crave social interaction.

Regardless of my motive, I have a large amount of information related to tatting (& some other lacemaking/needlework techniques) on my website that I want utilized. So I thought I would use my blog posts as a way to gently point to the content on my website: www.TheShuttleSmith.com

My website main page features two main items:
  1. the menu bar in which I have all my information in ‘pages’ archived permanently.
  2. My blog posts….which are uploaded periodically.
Since I like to read and learn about other people (especially tatters!) I thought I would share things about myself. That is why I have an ABOUT THE SHUTTLESMITH page on my menu bar. I just updated it by adding a picture of my tatted motorcycle and a photo of my ‘real’ motorcycle (also red–just don’t relate my choice of motorcycle color & me to the state football team that most Nebraskans are fanatical about!) and how I enjoy traveling to tatting events.

Here’s a direct link to that page: ABOUT THE SHUTTLESMITH

Friday, November 27, 2015

Tatting Shuttle Winders

SW2
My Tatting Shuttle Winder Collection


A little while ago, I came across a box of ‘stuff’ in my studio and found my Tatting Shuttle Winder collection. I use center-post tatting shuttles and these shuttle winders are made for them. I had gobs of Boye plastic ones & have recently discovered the joys of the Handy Hands Moonlit shuttles (they holds lots of thread). I occasionally use one of my shuttle winders when I’m at home and tatting in my favorite spot. Usually my tatting is done is small spurts of time while I’m at work (breaks) or waiting for something to happern—I don’t carry a shuttle winder with me.

In future posts I’ll give you close ups of these shuttle winders and what I know about them. The one on the left is handmade by a local tatter. I’m ashamed that I don’t know her name. But what I intend to do is find out more info to share with you all, possibly find out if she is still selling these beauties so that you all may purchase and enjoy one too.

If anyone has any information on the second one from the left (the dark brown wood one) please email me at  k.bovard@yahoo.com  so that I can share with everyone in the future.

I’m actually kinda embarrassed that I have 2 of the same shuttle winders (the right 2). That’s from a bygone era in which I had the expendable cash to buy almost anything I wanted and didn’t even realize I was buying duplicates!

Sunday, November 22, 2015

I have an Etsy store!

I am happy to announce that I have successfully traversed a new computer frontier and have created an Etsy store for my tatting books and shuttle.

My store name is: theshuttlesmith

I have my five tatting books and 17 glass/enamel tatting shuttles there.  I have many different colors to choose from (tatting shuttles that is).

Thursday, November 12, 2015

Tatting & the train--part 2

tattrldy left a new comment on my post "Tatting & the train":

This still sounds like a great way to take a trip. One day we are going to do it! When both my husband and I have vacation :-)
I was going to just leave a reply but thought I would express further my appreciation for train traveling and how it relates to my tatting.

Keep in mind that I live in Omaha, Nebraska and am traveling to Grand Junction, Colorado.  Not only is this trip 800 miles long, but it has two interesting portions of travel: 
  1. Traveling from Omaha, NE to Denver, CO--about 500 miles of mind-numbing interestate travel through the river valley of Nebraska (which is quite flat) and then traveling through the high plains of eastern Colorado.  One of the few great points about traveling this area in a personal vehicle is stopping in a tiny town called Paxton, Nebraska which has a very interesting restaurant/tourist attraction called Ole's Big Game Cafe.  Check it out here:  olesbiggame.com   It is truly one of those little travel secrets.
  2. Traveling from Denver, CO to Grand Junction--about 300 miles of breath-taking scenery through the Colorado Rocky Mountains.  Keep in mind that this is still interestate travel which can be nerve-racking in that there can be alot of traffic including many trucks while navigating steep ascents & descents.  But there is also another factor involved in this section of travel--that being weather, namely snow.  My husband and I have already experienced this once last May when we left Grand Junction, CO in our truck wearing shorts and sandals because the weather was so beautiful only to end up in very scary/hairy snowstorms in the mountains and high plains. 
May snowstorm while driving through the Rocky Mountains---going into the Eisenhower Tunnel at the Continental Divide in Colorado...it was just as scary on the other side of the Continental Divide, all the way into Denver and beyond.
 
So, with that introduction to traveling from Omaha to Grand Junction I will discuss my recommendation to travel via train:

I get on the train in Omaha, Nebraska at 11 pm. I immediately settle down to sleep--I take along a blanket and pillow. When I awake in the daylight hours we are in Denver where we have a bit of a get-off-the-train break & I get one of the most delicious coffee lattes (Pig Train Coffee Co.) I have ever tasted in the newly remodeled Denver Grand Central Station. Even if you aren't thirsty or hungry, DO just wander into the station...it is quite wonderful.  From Denver on, I am fully awake and taking advantage of the most beautiful scenery possible!!!  The climb up and out of Denver is nothing more that spectacular.  If possible, park yourself in the Vista Car.  If you are lucky there may be volunteer tourist guides in the Vista Car, talking about the history, flora, fauna and geologic & man-made points of interest along the way (& there are alot!).  At first the Vista Car can be a bit crowded, but eventually everyone goes back to their assigned seat or sleeping berths and I can find a seat.  The Vista Car allows you to see up and out alot better that the regular, coach cars.  As an added bonus, you usually get to talk to people.  Turns out I really am my father's daughter....I love to talk to people!!  In the Vista Car, there are tables that seat 4.  You are encouraged/suggested/actually they demand that you share the table seats.  This is OK with me--a chance to meet and learn about someone else.  Of course, just the fact that we are traveling on a train means that everyone has a destination reason and story to tell.  OF COURSE I HAVE MY TATTING WITH ME!!  The tatting seems to be a great ice-breaker to get someone to start talking.  Of course you get the "My grandmother used to do that" and the "I wouldn't have the patience to do that" comments, but despite what they think of my artform (yes! artform!) conversation has been started and I get to learn about someone new.  For many years I thought I was an introvert....I was wrong about that!  All the time I'm 'extroverting' in the Vista Car, my husband is getting to do what he enjoys doing in the Coach Car--napping, reading, watching movies, with the side bonus of he doesn't have to listen to me talk for awhile--it's a win-win travel arrangement.  Even when I'm not actively talking to someone, I love to people-watch.  You know everyone is coming from or going to somewhere special--whether they want to or not.  Everyone has an active story on the train.  Of course, there is also the whole scenery, scenery, scenery issue---lots and lots of the most beautiful mountains, canyons, meadows, rivers, valleys in the country, if not world.  The train goes through some regions where there are no roads, thus the scenery is unique.  Of course, for US (tatters!) the added bonus is we get to relax and tat while enjoying all this scenery!!!  No worries about road conditions, where to get gas, driving fatigue, etc. 

Our travel companions, Phil and Sheryl enjoying their time on the train.  Seat are quite spacious & recline quite a ways and include leg rests.  There is lots of room to store your stuff above you (unlike the crowded conditons on an airplane).

Tuesday, November 10, 2015

Tatting & the train

 
DSCN2486
This is me tatting on the Amtrak train ‘The California Zephyr’ somewhere in the Colorado Rockies—every glimpse outside was spectacular. I’m tatting in style with a wonderful beer. Later we found out it is against the rules to consume your own liquor on the train (they want you to buy their awful-tasting stuff).


DSCN2661

This is my newly-finished celtic cross. I just held it up and pointed the camera outside my window. This is beautiful scenery but not as spectacular as can be seen on The California Zephyr train between Denver, CO and Grand Junction, CO.

Friday, October 30, 2015

Padded + Split Ring Tatting–Quilt-Inspired

Here is a Quilt-Inspired Split Ring Tatting piece I have not posted yet. The top photo shows the piece as a work-in-progress–it shows a bit about how the piece is worked.

The middle picture is a diagram of how “Rail Fence” traditional quilt block works….it shows the individual quilt block and then how the quilt block looks/works when the basic design is repeated.

In traditional Split Ring Tatting Technique, the block would have to be make with each of the four colors as a separate ’round’ with only the darker color being ‘continuous’ from one block to another. However with the addition of Padded Tatting Technique to Split Ring Tatting Technique, I can tat a fairly large round continuously. It’s all about efficiency in tatting and minimizing/negating thread ends!

The top photo shows 2 rounds being tatted at the same time.

Each ’round’ requires 3 shuttles: 2 for the ‘base-color’ (yellow & black)–Split Ring Tatting Technique; 1 shuttle for the ‘padded-color’ (grey & blue).

DSCN1470
‘Rail Fence’ in progress–working two rounds at the same time (3 shuttles per round)
 
traditional rail fence
Traditional “Rail Fence” Quilt Block Basics
 
Quilt 2

These are the two motifs that I used as the ‘challenge project’ at the recent 2015 IOLI Convention tatting class (Fun with Quilt-Inpired Split Ring Tatting) I taught. Both motifs utilize both Padded Tatting Technique & Split Ring Tatting Technique simultaneouly. The bottom motif shows “Rail Fence with several ‘repeats’ of the basic design element.

Thursday, October 22, 2015

My tatting Bag–goes with me everywhere!

DSCN2478
The ancillary tatting tools I keep in my tatting bag


DSCN2480
My tatting bag
 
DSCN2469

DSCN2473
The shuttles in my tatting bag
 
I was on the Amtrak train 2 weeks ago heading from Omaha to Grand Junction for a long-weekend vacation when I decided to take inventory of what I had in my tatting bag. I love those little round, ‘jewelry-travel’ bags. My personal favorites are the ones without a rigid base—they squish-down better to stuff into my purse. I have this tatting bag in my purse and with me ALL THE TIME! In fact, if it accidentally gets left at home, I sort of freak out. It feels like a major part of my life is missing.

In regards to my shuttles: I use the Boye plastic fixed-center post shuttles. These are the shuttles I could find growing up in the 70’s (yikes I’m giving away my age!!) in rural NE Nebraska. Thus I got use to them: their feel in my hand, the (larger) amount of thread they hold, the usefulness of the point, etc. If you look close you can see my tatting-in-progress, a SRT snowflake of my own design. The ‘aero-type’ shuttles (the 2 colorful ones are HH Aerlits) are only in my tatting bag to be used as crochet hooks. I recently purchased the 3 HH Moonlit shuttles on the lower right. They seem to have everything I like in a shuttle: larger size (I have larger hands), same size as the Boyes; holds a decent amount of thread–probably more than my beloved Boyes; & a built-in hook—something I’ve never had before in a center-post shuttle. Pictured is also a Clover shuttle (my secondary-favorite shuttle) and a NAG (Needle Arts Goddess) handmade wood shuttle.

In regards to my Ancillary Tools (top to bottom): A paper copy of my current pattern; my reading glasses in a hard case (I’m old!); pen & mechanical pencil (to jot-down new pattern ideas & correct current patterns); Uncle Bill’s Tweezers (for the occasional opening-a-closed-ring problem); safety pins (for pinning my work in progress out of the way); scissor-snip in an enclosed case (God’s gift to my tatting!); an old perfume-sample glass vial, probably from the 60’s to house my size 24 tapestry needles that I use to sew-in ends; metal tooth-pick & sheath (my irreplaceable Split Ring Tatting tool to encourage tiny ‘joining-picots’ to be big enough to get a crochet hook into to create a join); 2 pieces of plastic (used to unwind/wind thread to create ‘continuous thread method’ between two shuttles–See previous post http://survivalarchitecture.com/shuttlesmithblog/continuous-thread-method-my-tip/  for my 'how-to' use it.
 

Friday, October 2, 2015

Free Pattern for another Anne Orr Historical SRT Design


After a long time away from this blog, I decided to send out another Anne Orr Illustrated Historical SRT Pattern.

This is what I call “#11″ out of Anne Orr’s ‘Book #14′.

The pattern is on my website ‘page’ at: http://survivalarchitecture.com/shuttlesmithblog/the-shuttlesmith-illustrated-historical-srt-patterns

I don’t know what happened to #10. I will have to look into this.

Thursday, September 10, 2015

What I did last weekend (tatting included!)

My vacation time (from Omaha, Nebraska where I live/work) has been spent this summer in Grand Junction, Colorado. This is where I was last weekend.
My time was spent working on the house there (a little bit) and seeing the sights of the beautiful area. One day we drove through the Colorado Monument National Park, getting out and hiking into different biomes along the route. It is truly beautiful/majestic.
DSCN2453
Hiking in the Colorado National Monument--what a view!
 
The other thing that we did was go motorcycling (dirt-riding to be more precise) in the desert and region around Grand Junction. We spent two days doing this and it was a great way to see and experience the desert. There are miles and miles of trails on BLM land that are there to be explored.
DSCN2421
Me and my motorcycle in the desert and the Bookcliffs of western Colorado
 
But I am happy to report that I did get some tatting done! I completed 3 snowflakes during the trip. I am now in 'Snowflake-mode', having fun designing different snowflakes on graph paper and then tatting them into thread. Look for a future book!
DSCN2466
3 Tatted Snowflakes I got done on this trip (split ring tatting--of course!)

Wednesday, September 9, 2015

Me and my Tatting on Exhibit

 
DSCN2335
Me at my Teacher’s Showcase Table at the IOLI Convention

DSCN2334
3-D Split Ring Boxes–future book
 
DSCN2333
Karen’s Keltic Tatting
 
DSCN2332
Some of my ‘Quilt-Inspired’ pieces in SRT
 
DSCN2331
Greek Key designs in SRT—future book!

Thursday, August 27, 2015

Quilt 2
Padded Split Ring Tatting Motifs—Top: Pinwheel; Bottom: Rail Fence


These are the motifs I designed and used for the recent IOLI Convention “Quilt-Inspired Fun with Split Ring Tatting” class I taught the end of July in Iowa City.

I used these two motifs as the ‘challenge-project’ because they incorporated using Padded Tatting Technique with Split Ring Tatting Technique.

In Padded-Split Ring Tatting there is a primary color/row in which you use two shuttles of thread of the same color and create the row with split rings. The secondary color is carried along (‘Padded’) inside the primary color stitches until it is needed and then is used to create a ‘Take-Off’ ring (as a regularly-tatted ring).

In the Pinwheel motif (top), each of the six rounds is done using 2 shuttle of the primary color (either red or blue) and one shuttle of the yellow that is carried along (‘padded’) inside the primary colored split rings.

In the Rail Fence motif (bottom), the piece is completed in two rounds: Round 1—Yellow & Gray; Round 2—Blue & Black. In Round 1, the Yellow is the primary color (2 shuttles=Split Rings) and the gray creates the ‘padded’ rings. In Round 2, the Black is the primary color (2 shuttle=Split Rings) and the blue creates the ‘Padded’ rings.

Tuesday, August 25, 2015

Playing around with Designs

 
Dia K7a Dia K7b
Sooooo, I was working on my Quilt-Inspired Designs for Split Ring Tatting book(s) getting them ready for printing and instead of doing what I was SUPPOSED to be doing (proofing what I have done!) I started to ‘play’ with the basic design on the left.

If you look at the basic design you can see that it is assymetric. But I decided to play with it anyway to see what a more complex pattern it could make.

The design on the right is the outcome. At first glance it looks symmetrical….but that is actually deceiving. It IS & IS NOT symmetrical.

My next step will be to play with what happens when I change the color of the diamonds.

Wednesday, August 12, 2015

A brief synopsis of what I've been doing lately

Book 4 Covercover 2

I have a new view of life lately!!! I have been getting ready to go to the IOLI Convention in Iowa City, Iowa (which was July 27-August 1) for over a year now. It all started when I was proposing classes to the Convention coordinators over a year ago. They liked the idea of a quilt-themed tatting class based upon Split Ring Tatting Technique. I had been playing around with the quilt idea to create tatting patterns for a while, but had not really dived into the topic. When this class topic was chosen, I DID immerse myself into the world of historic quilt blocks–a world of color, repetition and symmetry, all concepts that I enjoy in my tatting.

So for over a year, I have been studying historic quilt blocks and converting the designs into tatting. Once again, Split Ring Tatting Technique gave me the base to create my tatted quilt-interpretations.
I created two different books based upon quilt designs: Patchwork Quilt Blocks in Split Ring Tatting & Quilt-Inspired Designs in Split Ring Tatting. They are quite different from one another.

For the last year, I have spent every spare free minute I had working on some aspect of these two books….getting all the details done. I knew I was going to be ‘down-to- the wire’ with getting them printed that I decided to test my publishing skills by getting a third book done: Block Alphabets in Split Ring Tatting. This book of 2 different block alphabets (and frames to use the letters/number) had been about 90% done for several years. This book had lost my interest to finish due to the fun I was having with the Quilt-Inspired books. But I ‘buckled-down’ and poured my time into finishing it.
Alphabet CoverAll three of these books were published and printed in the time span of end of June to the beginning of July. I had possession of 3 boxes of my 5 books all in time to go to IOLI Convention where I debutted them.

Now they are available for purchase on my website: www.TheShuttleSmith.com 

Click on the “Tatting Books” tab. 

Payment is via PayPal

As both the author & publisher, your direct purchase from me is sincerely appreciated!

Monday, July 20, 2015

The cat’s in the bag–really!


DSCN2253
If you look closely you can see a tail (white-tipped) and a paw
 
 
DSCN2256
He really is in the bag!
 
I was working in my studio the other day and I was taking something out of a box. Pip (the cat) saw the box and was trying to get into it. I didn’t want this to happen so, I distracted him by putting a paper bag down and open onto the floor. Pip was immediately drawn to it, and crawled inside–a relatively tight fit, and started to purr loudly. I got a camera and took these photos. He was a happy cat.  Enjoy!

Don’t you just love the color of my carpeting?!?!? I pulled it out of a dumpster at work about 20 years ago! It works!!!

Friday, July 17, 2015

17 July 15 Update


DSCN2260 DSCN2264
Now that I have my 3 new ‘Fun with Split Ring Tatting’ books done I feel like I am on an downhill course. I am actively getting ready to go to IOLI Convention in Iowa City, Iowa in a couple of weeks (first week in August). My studio is a total mess, though I will have to say that it is a relatively ‘organized’ mess. I have piles of stuff that I am amassing to go to Convention. I’m teaching so I have had to get handouts and supplies for each different class. I am also vending, debutting my 3 new books and my two old books as well as my copper-enameled and leather tatting shuttles.

The two photos above are the Leather Tatting Shuttles that I am making for sale in the vending room. 

The top photo shows shuttles ‘almost’ done. The bottom photo show shuttles ‘on the way’ to done.

When I get back from Convention, I will put them for sale on my Etsy store along with some enameled tatting shuttles and my 3 new books. For a while, my 3 new books will only be available from me:
  • Block Alphabets in Split Ring Tatting
  • Quilt-Inspired Designs in Split Ring Tatting
  • Patchwork Quilt Blocks in Split Ring Tatting
I really have only this weekend to get things done, because next Thursday I get on an AmTrak train here in Omaha, Nebraska to go to Grand Junction, Colorado for a vacation for a few days. I’m looking forward to tatting (& talking to people about tatting) on the train. Hopefully I’ll have pictures to share.

Tonight, friends are coming over to help my husband learn to brew beer with the kit I bought him for Christmas. I have a bit of a secret: I love a good (dark, flavorful) beer! In fact, one of my favorite things is to sit on my porch, with my cats, tatting and a good beer. I don’t drink usually more than one….too many calories and alcohol. I’m really a cheap drunk!

Thursday, July 9, 2015

New Split Ring Tatting Book #4

Book 4 Cover
FRONT COVER
Book 4 Back
BACK COVER

I’m debutting 3 new books in my ‘Fun with Split Ring Tatting’ series at the IOLI Convention in Iowa City, Iowa the first week in August.

I have books being printed (as I type) and am hoping that barring any complications, I hope to have my books in hand by the time I leave to drive to Convention.

After convention, I will make all my 3 new books available for purchase through my website (PayPal processing & free shipping to US addresses) or through my Etsy shop (which I am still setting up) before releasing through wholesale outlets.

What you see above is the front and back covers.

Tuesday, June 23, 2015

I Need Help Naming my 2 New Quilt-Inspired Design in Split Ring Tatting

I'm hoping that a 'Quilter/Tatter' can help me decide 'how' to name my 2 new Quilt-Inspired Fun with Split Ring Tatting books.

Book Number One is what I might call 'Patchwork' designs. They are all square pieces and based upon stacking 'square-rings' (4-4-4-4). All designs are based upon historically-named 'quilt-blocks'. SEE DESIGNS BELOW
QISRT001 xQlt014Qlt026 xQlt010QISRT013 xx

Book Number Two is a deviation from Book #1 in that it features a variety of designs that are all still 'Quilt-Inspired'. Deviations included designs based upon 'offset-rings' in diamond shaped based patterns, non-square shapes, hexagon-based, more open-work, and 'pinwheel'-based designs. SEE DESIGNS BELOW
Qlt001 xQISRT044 xQISRT005 xQISRT008 ximg217 x
QISRT021 xQISRT003 x

Any ideas as to how to name these books???? I do want to use the terms 'Quilt-Inspired', 'Split Ring Tatting' in the title for both.

PS. I am working feverishly to get these 2 books laid out and printed/published by the end of July. They will be debutted at the IOLI Convention the first week in August along with another new book: Block Alphabets in Split Ring Tatting