Tuesday, September 16, 2014

Trip to Tat Days--Part 2


I think that I will start my official 'migration' of blogging only on my website/new blogsite:
www.TheShuttleSmith.com
I created a long blog post there that would take alot of time to recreate here....so please update your 'favorites' tab to my new address above. 
I have alot more photos on my website/blog of Tat Days activities.
This me, Karen Bovard, The ShuttleSmith, at my vending table---proof to the IRS that I was there!


Friday, September 12, 2014

Trip to Tat Days--Part 1

I think that I will start my official 'migration' of blogging only on my website/new blogsite:
www.TheShuttleSmith.com
I created a long blog post there that would take alot of time to recreate here....so please update your 'favorites' tab to my new address above. 
I have alot more ability to add not only posts but pages of content to share there...all in all, alot more versatility!
My motorcycle on the way to Tat Days in GA

Wednesday, August 27, 2014

I'm going to Palmetto Tat Days!

I have recently decided that I AM going to Palmetto Tat Days this coming Sept 5-6th!!
DSCN0770
My 1999 Moto Guzzi motorcycle with a button picture of a motorcycle that I just couldn't resist buying

 
Me and my beloved Moto Guzzi motorcycle will be zig-zagging our way through the secondary roads of America heading to Toccoa, Georgia.

I am busy prepping my motorcycle & camping gear for the journey.

I have created more Glass-Enameled Copper Tatting Shuttles. The enameled shuttles were actually the impetus/excuse to make the trip.

I invited my husband along to make the trip with me, but he declined....so its just me.

I plan to take a week to get there and a week to get home. My MO is to take secondary highways (no interstates!) and to camp (tent-out) as many nights as I can. I 'feel' safe(r) when traveling secondary highways and going through smaller towns. I'm fairly careful when traveling but do feel a hightened sense of insecurity when around big cities and interstate highways--they 'creep' me out---everything is so impersonal.

I leave Saturday and am planning to be in Toccoa, Georgia on Thursday. Google maps says the distance should be 1075 miles but the way I travel, it will be more. Who knows what I will see and the people I will get to talk to on my way there and back!!!! I'm a slight Extrovert (according to Myers-Briggs Test). I really am 'my father's daughter' in that I love to talk to people. My favorite thing is to eat in local diners, sitting at the counter. Eventually the 'old guys' will start up a conversation with me and I learn stuff.


Thursday, August 21, 2014

What is Copper Enameling--An Introduction

 
“Enamel? You mean you painted this with Nail polish? Bathroom paint? Resin?”

“No. I painted it with fire.”

The simplest definition of Copper ENAMELING is:   The fusion of glass powders onto a base of copper metal. 

The base metal has a higher melting point than the glass enamel so that the glass will fuse to the metal surface before the metal gets to the temperature in which it will melt.

The product of Copper Enameling is GLASS on a base of metal.

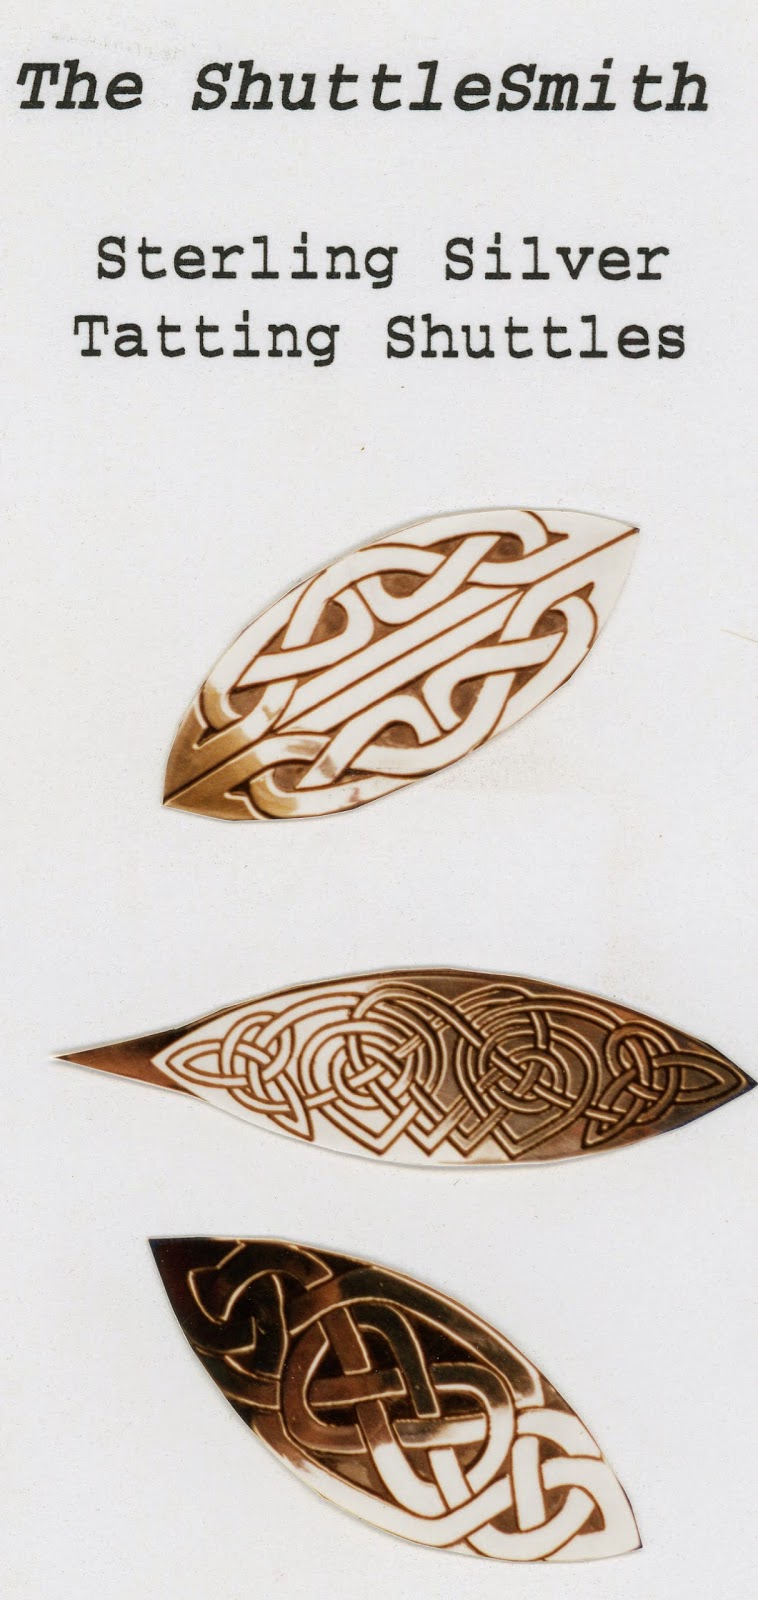
It is a way to decorate a metal base product (in my case tatting shuttles) with colors & patterns.  The end product is more 'Glass' than 'Metal'.  It actually 'tinks/sounds' like glass.....and the glass surface will break if the shuttle is dropped to a hard surface!

The major manufacturer of enamel powders (Thompson Enamels) offer 169 different colors of enamel.  There are two main categories of enamels:  opaque and transparent as well as other types such as metallic and opalescent.

Combine all those colors & types with various ways to 'decorate' or to customize the surface and you will find that the technique of enameling offers infinite possibilities. 

However, the caveat of that statement is also that enameling often offers unexpected results.  Some of these results can be 'good' surprises and occasionally there can be 'bad' results.  In 60+ shuttles that I have made, only one was a true and utter disaster. 

The enamel powder (finely ground glass with pigments and minerals) is applied to the metal base (copper usually--as it is cheapest--why use precious/expensive metals such as gold or pure silver when you are going to cover the surface with glass?) by various ways such as sprinkling, painting.  The the enamel poweder is 'fused' (you can read 'melted') by heating the metal and enamel powder unit to 1450 degrees Fahrenheit (red hot!) with either a torch or in a kiln.  I use a handheld torch with MAP gas.  This is why it is termed "Painting with Fire".  I can use the 169 colors to mix and match the powders together to create individual works of art. 

There is a large element of unpredictability involved.  The different colors of enamels each have their own physical characteristics as they are 'fired' to fuse/melt to the metal.  Enameling is an artform of which  it is said:  "Success may come early to the beginner, but then the enamelist spends a lifetime learning the intricacies".  I have found this sooooo true!  I achieved almost instant success in learning to enamel, but I have had some results that I didn't expect and weren't what I had hoped for.  I have found that enameling is a truly addicting artform....there are so many variations to try:  color combinations, many surface embellishing techniques.   Each piece of enamel art becomes it’s own experiment.  However, the process is forgiving in that the artist can build the piece in layers through multiple firings, adding, correcting, and modifying the work.

The ShuttleSmith Glass-Enameled Copper Tatting Shuttles are decorated on one side with glass-enamel that is colorful.  The backside is 'finished' with a layer of semi-opaque glass enamel.   The picture below is the backside of 5 randomly chosen shuttles to show the finish work.  Unfortunately, they are not as 'pretty' as I would like them to me due to the process that the piece undergoes in the enameling process.  But the shuttle backsides are covered and smooth--they will not oxidize (tarnish). 
Backside of 5 randomly chosen shuttles


Wednesday, August 20, 2014

Dresser Lace 4

 
This is the final posting about how I 'use' lace as a decoration in my bedroom.  My dresser and nightstand are dark wood that are great contrasts to white/ecru lace.  So I had glass tops custom cut  to sandwich my lace and keep it clean.   Now I have a usable surface that I can spill make-up and place my coffee cup on and still enjoy the lace without hurting it.
Shown here are 2 and a half pieces of Romanian Point Lace,  3 small tatted snowflakes (made by me), a piece of Teneriffe Lace and half a piece of Carrickmacross Lace (made by me).
 

Friday, August 15, 2014

Historical Split Ring Tatting Pattern #6 (Anne Orr)

Anne Orr Pattern #6 from Cross-Stitch and Tatting, Book No. 14 (published by J. & P. Coats Co., 1923)


go to:   www.TheShuttleSmith.com
look in Anne Orr Historical Split Ring Tatting Patterns
then look in The ShuttleSmith's Historical Illustrated SRT Patterns

The Pattern is in PDF.

Tuesday, August 12, 2014

This Blog Site is Going Away--don't panic yet!

I am going to be phasing out this blog site in favor of one site where I can have my website and blog in one place.

I am NOT stopping to blog! I am merely consolodating my information into one place.  This new approach to blogging will allow me to more easily post patterns and PDF files of techniques in one spot.  My wonderful husband set me up with a website and says that I have unlimited space....so I intend to fill it up with interesting tatting-related information/resources that I have tucked away in my files from years of creating handouts and patterns in my teaching past.

Right now I am 'double-posting' to both sites (this blogspot and my website:  www.TheShuttleSmith.com)

I have tried to consider a timeline in which I want to make this transition....I was thinking that by the end of 2014 would be an appropriate timeframe and I would discontinue using this blog. 

So, beat the crowd and update your link to The ShuttleSmith at:  www.TheShuttleSmith.com   I promise you won't miss anything!

In anticipation of this, I have transferred alot of the blog data from this site to my website as 'pages' under Previous Blog Postings on my homepage menu.  (I did not copy/transfer any non-informational material--only the 'good' stuff that has a bit of merit).

Historical SRT Patterns now available

I finally got around to figuring out how to add PDF files to my website pages!!!
 
I now have 3 Illustrated Pattern PDFs posted on this website
 
14 #1
Book #14, Pattern 1
 
14 #2
Book #14, Pattern 2
 
14 #3
Book #14, Pattern 3
 
 
Go to my website:  www.TheShuttleSmith.com

Then go to: Anne Orr Historical Split Ring Tatting Patterns on my homepage menu.

Then click on the subpage: The ShuttleSmith Illustrated Historical SRT Patterns.

I did not ‘design’ these patterns. They are historical patterns by the Anne Orr Studio that I consider the ‘missing links’ between the introduction of the technique of Split Ring Tatting Technique and the actual usage of the technique in actual patterns.

I have worked the patterns, making minor revisions, and then created a modern illustrated pattern. The original written patterns can be seen on my webpage under: Split Ring History on my homepage menu.

I will continue to add more of these historical patterns in the future. Watch here for announcements

Monday, August 11, 2014

12 New Glass-Enameled Copper Tatting Shuttles

I have decided to update my Copper Glass-Enameled Tatting Shuttles.
I took off the old ones and replaced them with 12 new ones.
They will be available until I decide to update in the future.
My 'babies' need homes!! Please 'adopt' them for a nominal fee of $25. Free shipping to US addresses.
Go to my website:  www.TheShuttleSmith.com
Click on 'Tatting Shuttles For Sale'

Monday, July 21, 2014

Dresser Lace 3

 
This is another posting of how I use lace.  This is my the top of my bedroom dresser.  It is a lovely dark-colored wood that was just begging to have lace put upon it!  So I did just that, covering the lace with a custom-cut piece of glass. Now the surface is still functional....I can spill and put stuff all over it and still my lace is beautiful.

The pieces seen in this view are: 4 tatted pieces (tatted by me); Teneriffe Lace (2)-upper left and right, Romanian Point Lace, the swan is a piece of Carrickmacross Lace (designed and worked by me), the circular piece is bobbin lace that a friend brought back to me from Belgium while on vacation.

Friday, July 18, 2014

My Tatted Motorcycle


As I mentioned before I am a 'motorcyclist'---a person who rides a motorcycle.  I want to differentiate that I am NOT a 'biker'.  Bikers are rough/tough type people....the kinda folks you might cross to the other side of the street if you meet them.  I am a motorcyclist in that I always wear a helmet and safety gear, even it I don't have to legally.
 
Many years ago, I tatted this motorcycle.  It is created as components and mounted to a piece of linen (which is sage-blue-green).  I cheated and just pulled the thread ends to the back of the linen and hid them that way.  I used a picture of a Triumph motorcycle to copy design/details.

Monday, July 7, 2014

What is Copper Enameling

Copper enameling is the process of fusing enamel (which is glass) onto a copper base. 

Enameling is the process of applying a layer of colored, finely ground glass particles to a surface (in my case: copper) of which it is made to adhere by heat (in my case: melted with a flame from a torch).

Enamel is glass.

Enamelling is the craft of melting glass on to a metal surface.

In time (when am in the same place as my pictures) I will show you my process of how I create The ShuttleSmith Glass Enameled Copper Tatting Shuttles.

Thursday, July 3, 2014

Tatting & Sympathy Card

This is what I like to make for sympathy cards. 
The tatted rose pattern is from one of Mary Konior's books--possibly the Tatting with Visual Patterns book.
I typed the poem into my computer and copied it onto a cardstock that has flecks of color.  That's why the background appears pinkish.
I glued the rose onto the cardstock.

Wednesday, July 2, 2014

My new website is Up & Running!!!! YEAH!

I've been keeping you somewhat up-to-date with my website woes...the fact is I used up all my space on my old hosting site and had to move.  My DH helped me with my new (WordPress) site this weekend and since then I have been working towards moving stuff from the old site to the new one.  I feel that I am far enough along to announce that my website is done and running.  I own my domain name (TheShuttleSmith.com) so all I had to do was 'forward' the domain name to the new hosting site. 

All you have to do is type in either:   www.TheShuttleSmith.com  or theshuttlesmith.com
and you should get to my new site which has one of my new enameled shuttles  (blue/yellow/orange) in the upper right corner and features orange frames/boxes.  (Orange and yellow are my favorite colors!)

Right now I have my books (2), Leather Tatting Shuttles, and an assortment of Glass Enameled/Copper Tatting Shuttles for sale.

Let me know (here or via email---  k.bovard@yahoo.com) if something doesn't work.  It's all a learning experience. 

Thursday, June 26, 2014

My Website (Google Sites) Woes--& what I have learned

First of all, I'm very surprised and pleased by the interest in my Glass Enameled/Copper Tatting Shuttles!!!  8 of them have been adopted and are now on their way to their new tatting homes.

I do have several more Glass Enamel/Copper Tatting Shuttles done, photographed and ready for purchase but have been having problems with inserting the photos into my website.  Whenever I try I get a message that says "....server error, please try again later".  I own my domain name (TheShuttleSmith.com) but use Google Sites as my hosting site.  So after repeatedly trying over several days and then asking my computer-genius husband to turn his thought-waves in the direction of my problem, we came to the understanding that I had used up all space for this particular website on Google Sites.  So I deleted a bunch of stuff thinking that if I purge some photos and pages I can add the ones I want--Right?  WRONG!  I learned that you can delete everything but it still remains (somewhere in computer twilight zone!) and counts as still there.  ARRRGGGHHH!  My current website is full...soooooo the only thing that I can do is 'MOVE ON'.  Right now I'm in the process of creating another Google Sites page with my information.  When I get it mostly done, I will redirect my domain name to this new site.  In the meantime, I am trying to learn, understand, and write a new website in WordPress.  All the website work is very time-consuming to me....time that I would rather be spending either tatting, designing, creating patterns, or making more glass enameled copper tatting shuttles.  My hope is to bring back my website and my blogging activity to one location---that being my domain name website.  (Don't abandon this blog yet!  I haven't).  I may double post on two blog sites for awhile...I haven't come to that bridge yet.

To further communicate what I learned about Google Sites:  My main problem was that I uploaded alot of photos to my website.  If I had linked to the image in a storage file, I would not have used up my space like I did.  If I do go to a WordPress platform for my website, I have been assured that I can have all the space I want....my husband owns the cyber space. 

Right now I need a 'new best friend' who is savvy with WordPress.

Tuesday, June 24, 2014

Problems with my website

I have been trying to post pictures of my new Glass Enameled Tatting Shuttles on my website to no avail!!!  I got a few pictures up with no problem and then I started getting "Upload Server Error. Try back later" messages.  I tried (without results) all weekend.  Today at work, I can upload images  BUT I don't have the shuttle photo files with me---ARGGHHH! 

I have about 10 more enameled shuttles created and ready for adoption.

When I get this issue resolved I will post here.

On the flip side 8 of my shuttles found new homes this weekend!!!  I was so excited that tatters actually want them! 

Karen / TheShuttleSmith

Saturday, June 21, 2014

My Copper Enameled Tatting Shuttles are For Sale

I have a few shuttles on my website FOR SALE.

I have been working all morning and afternoon trying to figure out how to make PayPal buttons and put everything on my website. 

I will continue adding in shuttles to the website as I have time and the internet connections allow--it has been flaky at times!

Go to:   www.TheShuttleSmith.com

At the top of the list on the left are my items for sale.

Copper Enamel Tatting Shuttles made thus far

                                                                                             
The ShuttleSmith Enameled Copper Tatting Shuttles as of June 20, 2014


DH was gone last night and I was all alone for the evening so I high-tailed it to my studio and made more copper enameled tatting shuttles.   I had received my order of sampler-sized packets of 166 different colors of enamel on Wednesday.  Now I am overwhelmed by the color choices that I have!  I try not to overthink (though I am rarely faulted for 'overthinking' anything) my color selections when I am working on the process....thus the final result is usually a surprise--even to me.

I decided to keep track of what colors I use on the shuttles and make a library of each shuttle I create including a photo and the enamel color names and numbers.  That is why each shuttle is sitting on a paper with handwritten notes.   This way if I ever want to recreate a particular color combination, I'll have the formula noted.  Each shuttle is kinda like my child....I'm not sure I am going to be willing to part with it/sell it.  So I can comfort myself with the fact that at least I'll have a picture of  'my baby' (aka shuttle) if  I have to 'give it up' (ie sell) for 'adoption' to someone else.

I am still figuring out how to sell them.  I think that I shall place a few at a time on my webpage with the option to purchase via PayPal.  But I have some work yet to do regarding that end.  When they are up for sale, I will report that happening here first.

Thursday, June 19, 2014

My enamel powders have arrived

Last night I raced home to see if my shipment of a sampler package of 169 colors of powder enamel had arrived.   IT DID!!!!!   So I spent the night sorting through the packages of color, writing the names on the packages and organizing them by colors.  There are two groups: opaque and transparent enamels.  Then I stayed up late prepping the metal into shuttle shapes so that when I get home tonight I can start actually adding the enamel colors to my copper shuttles.  With so many colors to choose from, it may be quite the delemma.

My ties to Pilger, the town in Nebraska destroyed by a tornado


My old church in Pilger, NE after June 16th tornado--all that's left
I understand that the tornado that ripped through the tiny town/village of Pilger, Nebraska  (in northeast Nebraska) on Monday, June 16th, made national (& probably international) news. 

It was one of my home towns.  I grew up on a farm equal distance (about 7 miles each) from both Pilger & Wisner.  I have stronger ties to Pilger because it was where I went to church.  The church (St. John's Lutheran Church) that was completely destroyed by the tornado was my church--where I was baptized, confirmed & married, family funerals.  All my family now lives in Norfolk, NE--20 miles away.  Many of my old farm area neighbors however did suffer damage.  One our family friends lost all their farm buildings but the house was still standing.  However the damage to the house was so extensive that it was considered a total loss and the family is moving out.  I really don't have any news to add to what you can read on the internet, papers, of on TV.  The damage is bad! 

Two years ago Pilger celebrated its 125th Anniversary as a village.  It motto was: "The little town too tought to die".  There really wasn't much commerce in Pilger--a convenience/gas store, post office, bank, senior center, bar/cafe, library, and volunteer fire department and farmer's cooperative.  We'll have to see how many businesses rebuild.  I heard on the TV news that the farmer's coop vowed to rebuild. 

Businesses that did survive:  the library, water tower, city park and swimming pool. 

Sunday, June 15, 2014

Copper Enamel Tatting Shuttles Debut

The ShuttleSmith's Copper Enameled Tatting Shuttles
Announcing the first photo of The ShuttleSmith's Copper Enameled Tatting Shuttles.

I received my new torch in the mail Thursday and then promptly locked myself into my studio for the last three days using it, working to produce the first  The ShuttleSmith Copper Enameled Tatting Shuttles.  Friday night I produced the two on the right.  Then on Saturday I made the other five.  Last night I made two more....not photographed. 

I love the process and the colors but am limited to the sampler colors that I bought.   So once I pulled all the processes together and proved to myself that I actually COULD make this work, I ordered a color sampler of all 169 colors of enamel that the company makes!  Now I am again checking the mail everyday, waiting for that to come in.   I will probably be so overwhelmed with the colors that I will be stymied. 

I will be taking the day off from shuttle making today to travel 100 miles to visit my parents in honor of Father's Day.   Then tomorrow I have to go back to my real job (the one that pays for the enameling supplies!) so I won't be able to get back to my studio---Sad face.  Copper Enameling is proving to be quite an addiction for me. 


Thursday, June 12, 2014

Dresser Lace 2

 
As I have mentioned before, I have other lace passions other than tatting.  They are the needlelaces of:  Carricmacross, Teneriffe/Nanduti, and Romanian Point Lace.  That is what is represented in the laces on my dresser and night stand.
The laces seen here starting from lower left to right are:  Tatting, Romanian Point Lace, Tatting, and then Nanduti. 
 
The tatted pieces were tatted by me.
 
This Romanian Point Lace piece was the first piece that I had ever collected/found.  I found it in an antique store in Riverside, CA while there to teach at a national needlework show.  It was filthy, a light brown color and covered in dust bunnies. I actually found it on the floor next to the dock door.  It was marked $10 (a price I was thrilled with!) but I took it to the clerk and told her where/how I had found it and that it was filthy.  She looked at it and quoted me a price of $2!!!!  I tried not to show too much eagerness in pulling out my money too fast!!!  I brought it home and soaked it overnight in Orvus detergent and the next day it was white and beautiful---quite the transformation.  This piece is not the most unique of this lace type , but it does hold a special place in my collection due to being my first and in how I obtained it.

Tuesday, June 10, 2014

What I have been working on

Just an update to fill you all in on what I've been working on


I have been working on getting tatting Book Number 3 ready to publish.  Of course it is SPLIT RING TATTING.  The title/topic is:  Block Alphabets in Split Ring Tatting.  It will feature 2 different alphabets with matching numbers as well as 'frames'  and ideas as to how to use the letters you create for decoration.  Right now I am sewing on letters and a frame I tatted to fabric base.  I will eventually frame it so that it mimics those filet crochet nameplates.  Hopefully soon I will have a photo of it to show/share.

The other things that I am working on/towards is to create some new and unique tatting shuttles.
This includes:
  • The ShuttleSmith Tatting Shuttle Endeavor Number 1 is Leather Tatting Shuttles
I've already debutted one form of my leather shuttles--those that are double layered.  This features bonding a colorful, decorative leather to a base layer of leather that is sturdy.  I have  several colors already made, plus I purchased a whole bunch more leather scrap pieces in some great colors to make more. 
Leather Tatting Shuttles as of 6/10/14


  • The ShuttleSmith Tatting Shuttle Endeavor Number 2 is Stone Tatting Shuttles
I have been apprenticing with a master lapidarist who has been teaching me about rocks and mineral specimens---it has been a fascinating journey thus far.  I had actually taken two separate lapidary classes in the past and know a little bit about the process and had actually even made a prototype stone tatting shuttle (though I can't find it today).  Bruce has been collecting mineral specimens and cutting/polishing rocks into jewelry pieces since he was a kid (check out his website: http://www.thefinestthings.com/).  The problem with learning from Bruce is that he has the best tools available....so I was apprehensive about his kind offer to learn on his tools, knowing that I would be not able to afford such wonderful machines.  Recently he 'hooked me up' with a local guy who was selling off some lapidary machine.  I went down and bought it but haven't had time to play with it.  It needs to be hooked up to a water source which is a bit difficult.  Plus, Bruce & I are busy with other aspects of our lives (eg. lawns, landscaping, home repairs, motorcycling--me) this time of year and haven't had alot of time to explore this hobby.
  • The ShuttleSmith Tatting Shuttle Endeavor number 3 is Copper Enameled Shuttles
This is what I am actively working on.  I took an introductory class and discovered how much fun it was.  We made jewelry but my thought was 'How can I make tatting shuttles!'.  I have had success with creating jewelry peices but as yet haven't finished a tatting shuttle YET.  By the end of the week, I should have a prototype.  I am actively checking my mail for a new torch that will be hot enough to heat the larger piece of copper that forms the shuttle.  BTW, 'enameling' is the process of fusing glass onto a base, in this case copper.  I have alot of color options to play with.  Hopefully I will soon have something to show you......


Website is fixed

Hello all,

Just an update that I FINALLY got around to asking my husband (a computer genius!--hopefully he will read this and continue to help me with my computer woes!) to look at my website issues.  You all were saying that you got a blank page.  So I tried out 3 different web browsers (Internet Explorer, Mozilla, and Google Chrome) to see what I got when I put in my website address.  On the latter two I got a blank screen.  On Internet Explorer, I had the option to go to another screen page that did let me in, and was how I was able to get content onto my webpage recently.  The husband-genius figured out that Google had changed how it handles things and thus he was able to figure out a fix. 

Sooooo....this all means that you can go to my website  www.TheShuttleSmith.com   and check out:
  • The latest Free Split Ring Tatting Pattern
  • 'Lace Handkerchief Origami'---a tutorial on how to fold a lace hanky so that all the lace will show.
Sincerely,
Karen Bovard
The ShuttleSmith
Omaha, Nebraska

Wednesday, June 4, 2014

Lace Handkerchief Origami


Lace Handkerchief Origami

I've been doing this for quite some time...but just recently decided to write up the directions as to how to do it. 

The directions are in a PDF file on my website:
www.TheShuttleSmith.com

Go to:  "Lace Handkerchief Origami" tab

Click on the pdf file at the bottom of the page.

There is even a pattern that you can print out to learn the technique on paper before attempting it with your precious lace hanky.

Thursday, May 15, 2014

Free Split Ring Tatting Pattern

I finally got around to packaging another Split Ring Tatting pattern for distribution.

This pattern is from my first book Fun with Split Ring Tatting.

Go to:  www.TheShuttleSmith.com

Click on "Free Split Ring Tatting Pattern"

Thursday, May 8, 2014

Another Way to USE Lace

My friend Susan and I were hosting 'book club' a couple of days ago and in the preparation process, Susan showed me a box of crocheted doilies that she had found while cleaning out her parent-in-laws house.  As we were looking through them, I tried to instill a sense of appreciation in her for what she had.  So I grabbed one of the doilies and showed her how to wet it, and block it out on the countertop so that it would look better.  However, the time came when we had to go on with our hostess prep and the doilies had to go away.  So I was looking for a way for Susan to take the (still wet) doily with her and in the process grabbed one of the clear, plastic plates that we had out to use for our party.  It fit perfectly.  Then we got the idea to put another plate on top of the bottom one and the doily....and we realized that we had just created a LACE PLATE!!!!  So we decided to use it for our goodies. 


At the end of the evening, Susan insisted that I keep this doily.  She promised me that she would love and appreciate the rest of the doilies in the box!!!

Susan using the LACE PLATE


Thursday, May 1, 2014

Another Blast from the Past--Silver Shuttles 2


These 3 designs were my
biggest sellers.
I was cleaning through some old stuff the other day and came across a folder of my original artwork for The ShuttleSmith Sterling Silver Tatting Shuttle brochure.  I sold these things when the WWW was in its infancy.  So I made and sent out a brochure.  The picture is from my front cover.  I can't tell you how much time I spent trying to get good film-based photos of my sterling silver shuttles!!!!  Again I'm aging myself because this was before digital photography was commercially viable.  The problem was getting photos of something so shiny without getting yourself or some other reflection in the image.  Actually, come to think of it, I used to do alot of my photography in the medical center's (where I worked) morgue/autopsy suite.  They had a photography stand set up and I would bring my special light bulbs (after hours, of course) to get the right color of lighting.  I would set up the shots, shut out the overhead lights, and then run back (in the dark, in a morgue!-YIKES) to take the shot.  This was to keep the time down on my special lightbulbs (that were expensive and not long-lived).


Tuesday, April 29, 2014

Leather Tatting Shuttles Debut!!!!

The ShuttleSmith Leather Tatting Shuttle

The ShuttleSmith is living up to her pseudonym/name!!!  'Smith' is used to refer to someone who makes something.  In my case this means SHUTTLES. (Sorry, I'm not referring to my Sterling Silver Tatting Shuttles now.)              
 
My newest venture is making:  LEATHER TATTING SHUTTLES

They are Flat Tatting Shuttles.  Look closely in the picture to see the slits emanating from the cut-out holes, this is how the thread is wound on. 

Right now I have one style of flat, leather shuttles: a decorative/colored leather bonded onto a stiffer, backing leather.  (Another style/form is coming soon).

I currently have two sizes ranges: 
  • The basic shuttles are 3 to 3.24 inches long by 1 to 1 3/8 inches wide
  • The 'smaller' shuttles are 2.5 to 2.75 inches long by 1 to 1 1/8 inches wide
Price should be $15 with free shipping to US addresses, regardless of size.

I haven't figured out yet how to sell these yet on my website.  All the color and size choices make the system fairly complex. 
Ths photo shows the front and the back side of the leather shuttles. I have spent time bevelling the edges of the backing leather for a smooth tool.
 
These are the colors of Leather Tatting Shuttles that I have available now.  There is only one tan and one white shuttle at this time....but more white shuttles are possible


Wednesday, April 23, 2014

Nightstand Lace--Nanduti


Robin asked 'what kind of lace was on my nightstand?'  so I will start here highlighting my 'pretties'.  It is Nandhuti (or Nanduti) Lace.  Made in Paraguay.  It is in the same lace family as Teneriffe or Sol Lace.  I consider it the PHD level of Teneriffe Lace.  Teneriffe lace is made with individual motifs (sols/circles/shapes) that are stitched together into one larger lace piece.  Nanduti is made as one piece, laying down the 'warp' threads onto a cloth base in which the design is drawn and linking the warp threads of the motif designs as they are stitched.  Nanduti can usually be distinquished by the 'palm shapes' on the border of the work (see the upper/first picture) and a filling (seen in the middle of both of my pieces) that is created similarly to drawn thread work in needlework techniques.

These two pieces are my favorite due to the color.   The warp threads are one color and then the weaving/stitching is done in contrasting colors.   In the top piece, the warp threads are yellow/orange, with many vibrants colors used to stitch the designs.  The bottom piece used white warp thread and then red and green to stitch the design.    The motifs in the top piece are varied designs and represent elements from the Paragauyans life (corn, lotus flower, ant hills, etc.)  I have several books on Nanduti Lace, many of which I can't read.  Not only are they in Spanish, but they use native language words of the indigenous peoples who still make this lace.
 

Monday, April 21, 2014

My Bedroom Dresser/Nightstand--Use of Lace


This is my bedroom dresser and nightstand and how I USE lace as decoration.  My husband and I bought this dark wook bedroom set and I realized that the wood top was so pretty that I didn't want to put anything on it.  So I came up with this idea to cover it with glass and then not have to worry about what goes on it.  I put some of my lace (collected and handmade) under it and now I have a work of art that I enjoy. I will highlight some of the pieces more in depth in future blog posts.
 

That is me with my kids in the picture on the nightstand


Thursday, April 10, 2014

What happened to The ShuttleSmith's silver shuttle business?

I have considered making them again.   I originally took a year off from making them and when I wanted to go back to the business I learned that the company that etched my celtic designs into the silver had quit.  They said that this service was too popular and they couldn't keep up with the demand...so they stopped. (Doesn't make any sense to me!).  I did look into finding another custom etching service but discovered that it was going to be a costly venture to get set up.  Since these were my most popular shuttles, I lost interest in making sterling silver shuttles altogher.  About a year ago, I got interested in making some shuttles again.  I still have some silver stock left over.  However, I soon realized that the cost of silver had gone up 3-4 times what I was paying.  When I ran out of my stockpile of silver, I would have to pay alot more for my basic supplies.  I put ALOT of time and craftsmanship into making these things, and thus I realized that I wasn't willing to take a loss on them.  I still think that financially, people still don't have as much expendible cash to buy such novelties/luxuries at the inflated price that I would need to ask.   So I just haven't gotten back to making them.  My idea is that when I do go back to the silver shuttle making business, the shuttles will be 'one of a kind' art pieces.

I am however, making different forms of tatting shuttles true to my company name.  I will be introducing one form here on this blog shortly!!!   STAY TUNED.

Friday, April 4, 2014

Lace Related Traveling again

I'm leaving tonight for another 5-day mini vacation.  This time to visit my daughter in Tacoma, WA.  Tomorrow I teaching a tatting workshop for the Lacemakers of Puget Sound.  Sunday through Tuesday my daughter and I are taking a discover NE Oregon trip to the Oregon coast, Portland, and the Columbia River Gorge National Scenic Area.  I fly home on Wednesday, go to work on Thursday.  I should get some tatting done in the airport and on the planes.  Right now I working on split ring tatted alphabet letters and a frame for myself and to be featured in my next book:  SPLIT RING TATTED BLOCK ALPHABETS.  I should have updates about my trip when I get back.  I'll be having too much fun to stop and blog....sorry.

Tuesday, April 1, 2014

The ShuttleSmith Sterling Silver Tatting Shuttle


Here's a 'blast from the past'!  This is one of the sterling silver tatting shuttles that I USED to make.  It was how I chose my name:  The ShuttleSmith (The Silver Shuttle was taken back then).  I made sterling silver tatting shuttles for about 5 years. I quit in 2001 because it seemed like I had saturated the market and also because my full-time job was getting more demanding and the time needed to attend to the shuttle selling and marketing side of my business was getting to be a real drag. 
I had plain silver shuttles, and overall design versions, and then I had 6 celtic designs that I had custom etched into my silver.  I would custom make my shuttles with or without a point.  The plain & overall design shuttles came in your choice of sizes and shapes.  My shuttles were real works of art....they came without any scratches or even finger prints of any kind on the surfaces, front, back, edges.  Some 'copycat shuttles' came out a little after mine were in the mainstream and were not as finished.

This shuttle is one of my celtic designs.  I called it 'Hearts Entwined'.  I have a leather cord running around the center post so I can wear it like a necklace (got that idea from Betty Alderson of Snowgoose who bought and wore one of my shuttles).  This is not the best picture...I snapped it while it was hanging from my necklace holder on my bedroom wall.  The design is etched into the silver and then I blackened the recessed areas so that the design would pop out.  I then put a thin layer of lacquer on the surface to seal in the design and so that the silver would not tarnish.

Thursday, March 27, 2014

A Tatter Lives Here


This is the placard that I have hanging in my studio.  It is ceramic with the tatting embossed into the clay and then painted.  The picture doesn't show it, but the shuttles are silver colored.

My ex-husband said that I really didn't need the sign to convey the fact that a tatter lived in our house.....the messiness of my house pointed to that truth.

Does anyone know who made/sold this?  It is probably 15-20 years old.

Friday, March 21, 2014

Denim Shirt Embellishment--Pattern Variation #2


I used this triangle-shaped motif for the collar of my denim shirt project.
Round 1
*R1: 11-6.
RW
Ch: 8.
RW
R2: 6 + 5 - 5 (to p of R1).
Shoelace Trick/Switch thread position.
R3: 11 - 6.
RW
Ch 2: 8.
RW
R4: 6 + 5 - 5 (to p of R3).
R5: 6 - 5 - 6.
RW
Ch 3: 8.
RW
R6: 6 + 5 - 5 (to last p of R5).
RW
R7: 6 + 5 - 5 (to p of R2).
RW
Ch4: 8.
R8: 6 + 11 (to p of R7).
**
R9 to R16--Repeat from * to ** one time.
Cut & tie.

Round 2
R1: 11 + 6 (to p of Rnd1, R4)
R2: 6 + 11 (to p of Rnd 1, R5)
Ch1: 8.
RW
R3: 6 + 5 - 5 (to p of R1).
RW
R4: 11 - 6.
Ch 2: 8.
RW
Trefoil--R5: 6 + 5 - 6 (to p of R4).
R6: 6 + 10 - 6 (to p of R5).
R7: 6 + 5 - 6 (to p of R6).
RW
Ch3: 8.
R8: 6 + 5 - 6 (to p of R7)
RW/Shoelace Trick.
R9: 6 + 5 - 6 (to p of R3).
RW
Ch4: 8.
R10: 6 + 5 + 6 (to p of R9, to p of Rnd1, R12)
R11: 6 + 11 (to p of Rnd1, R13).

Tuesday, March 18, 2014

Historical Split Ring Tatting Pattern #5 (Anne Orr)


Anne Orr Pattern #5 from Cross-Stitch and Tatting, Book No. 14 (published by J. & P. Coats Co., 1923)

I have also included a bonus variation pattern.

Direct link to the pattern:
https://sites.google.com/site/theshuttlesmithinomaha/split-ring-tatting-history/anne-orr-patterns

Friday, March 14, 2014

Fondling my favorite thread stash--aka 'Inventory'


The other day I was taking inventory of my Anchor Cordonnet 20 thread.  I absolutely adore  this thread!!!  Some of this stash is 20+ years old.  I started buying it at the IOLI Convention in Puerto Rico (can't remember the year). 

When I started putting different colors of split rings together in my designs, I was noticing differences in thread size (within the same manufacturer/thread size) in different colors.  Thus I turned back to my old favorite---Anchor Mercer Cordonnet 20 for perfect results. 

The thread is still made and sold in Europe, but  only one place in the US sells it today (that I know of). 

When I was on the national needlework show circuit, Coats/Anchor would donate threads for my classes....and I approached the US importer/distributor about the possibility of getting it in....to no avail.  It was "Not available. Period". 

Now that I have just recently placed my order and have had email confirmation that 15 more balls of thread are on their way to me, I'll tell you of my source.   It is The Tatting Corner in Indiana.  Go to:
www.Tattingcorner.com.  Jennifer, the owner, is a bit like my drug-of-choice-dealer....she keeps me connected to 'the good stuff'.

I am so enamored with these threads that I have even paid a very premium price to order these threads from England to get large quantities of a grey-colored thread that I have need of for a large 'art' piece that I have designed (which I haven't started.)

These threads are amazing.  I can mix the 'new' threads bought from The Tatting Corner with my 'old' threads purchased 20+ years ago and they match in size.  The colors between lots/years match perfectly too.  My 'old' thread is as strong/non-breaking as it always was--and I put alot of pressure on my threads pulling my rings VERY tightly closed.

BTW, if anyone has some of these balls of thread that they don't completely love to the N'th degree and are willing to part with them, I would love to buy them!!!  Maybe we can work out a deal for one of my books:  Fun with Split Ring Tatting or MORE Fun with Split Ring Tatting.  Currently the balls of thread are going on the open market (aka The Tatting Corner) for $5.95 a ball.


Saturday, March 8, 2014

My tatting/train trip to Colorado

Last weekend, I took a trip from my home in Omaha, Nebraska to Grand Junction, Colorado to visit my son (who I haven't seen since August).  I had always wanted to take the Amtrak train and decided that this was the perfect opportunity because it was winter, driving the 800 miles could be stressful.  The train (called the California Zephyr) picked us (my husband went too) up in Omaha at 11pm Saturday night, and we promptly settled down to sleep for the night.  The coach seats were very comfortable and had a large amount of leg room, plus adjustable leg supports and foot rests---100 times better than airlines.  We slept through the night and got to Denver about dawn.  From Denver on to Grand Junction, it was light out and the scenery was EXTRAORDINARY!  Coming out of Denver until the continental divide everything was covered in hoarfrost--quite the sight.
Hoarfrost scenery coming out of Denver into the mountains
This image is the best I have, and really doesn't do it justice.  Every little grass stem and thing was covered in glimmering frost. 

The trip from Denver to Grand Junction was all in daylight and I had planned ahead to spend the time tatting.  The train took us through all kinds of scenery but the most spectacular was going through canyons.  Every glance out of the train windows was beautiful in a different way.

This is me, in tatting glory in the Vista Car.

On the way there I tatted this!
Coming home, we got on the train in Grand Junction at 10:30 am and had daylight through the Rocky Mountains again all day until we got to Denver at dusk.....another full day of tatting glory.  From Denver we slept again, getting home to Omaha at 5:30am.  I had gotten enough sleep on the train that I went to work that day.

On the way home I tatted the piece on the table.  It is the same design element as the previous piece, just the motifs are joined in a different way, producing a very different appearance.  Both are destined to be in my 'Quilt-Inspired SRT Designs' book.   
The two days that we were in Grand Junction with my son, we spent skiing and hiking.  Billy works for Powderhorn Ski Resort and got us very good rates on a day of skiing.  I didn't do any tatting that day.  I hadn't skiied for probably 10 years and was nervous about doing it, but I picked it back up quite quickly and was comfortable enough to keep up with my 20 year old son while doing blue/intermediate level ski runs.  I had a blast but was pooped out at the end of the day.
This is me on the ski lift at Powderhorn.  Quite the vista from there!      

The second day, we went hiking to two different biomes:  1. up a ridge to a mesa  2. through a canyon.
This is Jerry and I during the Canyon Hike


The trip was an huge success.  We spent two days traveling on the train during which we were able to relax and enjoy spectacular scenery, doing what we enjoyed:  Me--tatting,  Jerry--reading, watching movies, napping.  I highly recommend train travel, especially the California Zephyr which takes you through the magnificent Colorado Rocky Moutains.  The two days not traveling was spent doing very physical activities that we have great memories of:  skiing and hiking.   I enjoyed seeing and spending time with my son in his chosen home.  I know why he loves it there...it really is a great place to live.  I miss him terribly but understand that he needs to find out where & how  he wants to live his life.  In the meantime, I have a great place to visit him in.   I will be doing this trip again....probably on the Amtrak train too.
My son, Billy, in his adopted home.


Thursday, March 6, 2014

Quilt-Inspired Split Ring Tatting Designs 1

Just thought I'd show you what I've been working on lately.  This is one of my 'Quilt-Inspired' SRT designs.   As I write this I realize that I don't remember what the quilt-name is for this pattern---'something-Star'.  The quilt designs let me play with colors, which I think is one of the main things that quilters love about their artform.


Friday, February 28, 2014

Posts absence

I've been busy (at work) and haven't had the time to get to posts here.  I try to put something up with a photo...therein lies the additional problem in why I haven't gotten a post out--I haven't had the time to get photos either onto or of of my camera/thumb drive/computer.  So I thought at the very least I'd tell you what I've been up to.  All my tatting falls into the Split Ring category lately (and for the last 3-4 years).  I am finishing up 'one more' SRT cross for my 'Cross Book'.  I have been working on the computer on a 'SRT Alphabet Book'.  I have two alphabets worked up (designed & illustrated patterns created and edited one time): a 5 wide by 7 high capital letter alphabet and a 9wide by 10 high blockier capital alphabet with serifs.  I have designed a couple of frames for using the letters.  Right now a first draft is on its way to my tatting friend and editor Jennifer Bartling who will proof the patterns and has volunteered to tat up some of the letters and frames for inclusion in the book.

I have been having fun tatting what I call 'Quilt-Inspired' designs.  I've been taking photos of them as I get them done--they are not blocked or cleaned up in photoshop.  I will be putting them up here on my blog to see it they interest anyone or not.  Even if no one else likes them, I've been having fun creating them.  My creativity is in three steps:  1. finding inspiration on the internet or in life for a design, 2. creating the patterns on graph paper, 3. Tatting them up in thread.  I love each and every step!

I've been putting together class proposal ideas for a one-day workshop.  I'm going to visit my daughter in Tacoma, WA the first weekend in April.  Unfortunately it doesn't coincide with the Lacemakers of Puget Sound meeting weekend.  But they may be interested in having me come in on Saturday to lead a workshop.  Wouldn't that be fun to meet and hang out with tatters in a new area!!!!

In the future I am going to create a blog site with my resume and class proposal ideas in case anyone is looking for a workshop teacher (ME!!!).  The 2015 IOLI Convention is in my neighborhood (sort of) and I am hoping to be able to propose class ideas to them.  I live in Omaha, Nebraska and the convention will be in Iowa City, Iowa---a mere 5 hours away.  It's actually a city that I used to motorcycle to once a year (pre-divorce).

Enough of the past.

This weekend, I (and hubby) am boarding an Amtrak train in Omaha and riding it to Grand Junction, CO where my youngest (son) lives.  I haven't seen him since August!!!!  We get on in Omaha at 11pm Saturday night and ride through the boring parts of NE and CO during the night.  We get to Denver in the morning and then go through the majestic Colorado Rocky Mountains during the daytime.  I'm planning to sleep during the night and be wide awake for the mountain portion!  We get to Grand Junction, CO at 4pm and I get to see my baby (and buy him supper).  Monday and Tuesday we are skiing at Powderhorn Ski Resort (where Billy works).  Pray for me, because I haven't skiied in probably 10-15 years.  Hope I still remember how.  Wednesday we board the train to head home. 
I intend to take tatting along for the train.  We will probably be busy the rest of the time skiing, eating, and in my case spoiling my son while I can.  We are supposed to get back to Omaha at 6am on Thursday and if I get enough sleep on the train during the night, I will go to work that day.

Karen Bovard
The ShuttleSmith
Omaha, NE

Thursday, February 13, 2014

Denim Shirt Embellishment--Pattern Variation #1


This is the first variation of the edging pattern that I used to decorate one side of a button placket on a denim shirt.

It is tatted in two rounds.  The first round is a (very slight) variation of the original design published in The Tatter's Treasure Chest, edited by Mary Carolyn Waldrep, Dover Publications, NY, 1990.  This was an out-of-copyright pattern republished by Dover Publications from a J. & P. Coats Tatting publication.  The pattern can be found on page 78-79 of The Tatter's Treasure Chest.  Round 2 is created from a component of the upper edge of Round 1.

The following pattern is going to be in the form of an EDGING PATTERN.

Round 1 Pattern 
This round can be tatted in one of two ways:
A.  Using 2 shuttles.
B.  Using one shuttle/ball of thread and the Shoelace Trick (switching the positions of the two thread sources).

R1: 11 - 6.
*
R2: 6 - 5 - 5.
RW.
Ch1:  8.
RW.
R3: 6 + 5 - 6 (to last p of prev R, R1).
RW.
R4: 6 - 5 - 6.
Ch2: 8.
RW.
Trefoil: R5: 6 + 5 - 6 (to p of prev R, R3).
R6: 6 + 10 - 6 (to p of prev R, R4).
R7: 6 + 5 - 6 (to p of prev R, R5).
RW.
Ch3: 8.
RW.
R8: 6 + 5 - 6 (to p of prev R, R7).
RW/Shoelace Trick.
R9: 6 + 5 - 6 (to p of R3).
RW.
Ch4: 8.
R10: 6 + 5 - 6 (to p of prev R, R8).
**
Repeat from * to ** until desired length.
Rx: 6 - 11.
Cut & Tie.

Round 2 Pattern
1 Shuttle/Ball of Thread--simple ring/chain tatting

R: 11 + 6 (to p of Rnd 1-R1).
R:  6 + 11 (to p of Rnd 1-R2).
*
RW.
Ch: 8
RW.
R: 6 + 5 - 6 (to p of prev R of Rnd 2).
RW.
Ch: 12
RW.
R: 6 + 5 - 6 (to p of prev R of Rnd 2).
RW.
Ch: 8
RW.
R: 6 + 5 + 6 (to p of prev R of Rnd 2, to next p of Rnd1).
**
R: 6 + 5 - 6 (to next p of Rnd1).
Repeat from * to ** until desired length.
Final R: 6 + 11 (to next p of Rnd1).

I used 6 repeats of the pattern for my shirt cuffs.

I hope this written pattern is correct!  I haven't written pattern directions this way for a long time....I'm an illustrated pattern kinda pattern writer/designer.